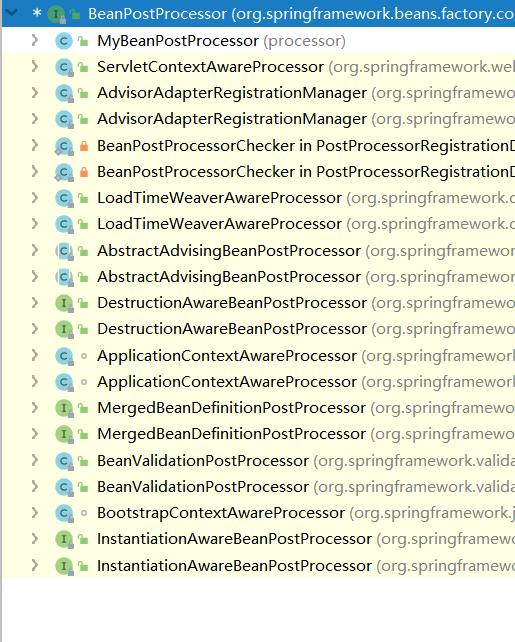
SPRING注解驱动开发-雷神课程超详细笔记

时间:2021-03-21


2022-04-06更新:最近翻起一年多前写的笔记复习,还是收获颇多,很多当时无法理解的知识现在慢慢能理解了,可能是工作一年的经验?也可能是源码看多了把很多细节都记下了,哈哈。

spring核心概念 di和ioc。spring 认为所有的组件应放在容器中,组件间的依赖可自动装配

注解版 spring作为ioc容器的一些基本使用

1
2
3
4
AnnotationConfigApplicationContext //注解版用的spring容器对象
applicationContext.getBeanDefinitionNames();//容器中定义的bean名称
String[] names = applicationContext.getBeanNamesForType(Person.class);//获取容器中指定类型的bean组件的名字

使用配置类,代替配置文件:

通过标注@Configuration注解,声明注解类

通过@bean注解在方法上,注册bean

使用@scope来指定bean的作用范围

singleton和prototype

单实例下,ioc容器启动就会创建bean对象,放到容器中

多实例下,主动获取bean的时候,才创建对象

懒加载

scope为单实例,默认主动创建

可以手动设置为懒加载,使用@lazy

@conditional 通过条件来注册bean

这个注解可放在类上,也可以放在方法上

这个特性,springboot的底层大量使用

基本使用

1
2
3
4
5
6
7
8
9
10
public class MyCondition implements Condition {
public boolean matches(ConditionContext context, AnnotatedTypeMetadata metadata){
ConfigurableListableBeanFactory beanFactory = context.getBeanFactory();
Environment environment = context.getEnvironment();
BeanDefinitionRegistry registry = context.getRegistry();
return false;
}
}

@Conditional({MyCondition.class})

通过componentScan配置包扫描

includeFilters excludeFilters可以配置过滤扫描

举个例子

1
2
@ComponentScan(basePackages = {"bean","controller"},excludeFilters = {@ComponentScan.Filter(type = FilterType.ANNOTATION,classes = {Controller.class})})
//按照注解的方式排除,排除bean包下,标注了Controller这个注解的类

@import 给容器中快速导入组件

有三种使用方式

最普通的class对象
1
2
@Import({Color.class})//导入组件
//id默认是全类名
importSelector

实现这个接口,返回需要导入的组件的全类名

1
2
3
4
5
6
7
public class MyImportSelector implements ImportSelector {

// 返回值数组,是要导入到容器中组件的全类名
public String[] selectImports(AnnotationMetadata importingClassMetadata) {
return new String[0];
}
}
ImportBeanDefinitionRegistrar

实现这个接口,直接拿registry对象,给容器中注册对象

1
2
3
4
5
6
7
8
9
public class MyImportBeanDefinitionRegistrar implements ImportBeanDefinitionRegistrar {
public void registerBeanDefinitions(AnnotationMetadata importingClassMetadata, BeanDefinitionRegistry registry) {
boolean res = registry.containsBeanDefinition("person");
if (!res) {
RootBeanDefinition beanDefinition = new RootBeanDefinition(Person.class);
registry.registerBeanDefinition("person",beanDefinition);
}
}
}

factoryBean

实现这个接口来导入bean

在spring整合其他技术的时候,这个特性用的非常多

1
2
3
4
5
6
7
8
9
10
11
12
13
14
public class MyFactoryBean implements FactoryBean {
//注册到容器中的时候,调用getObject方法,实际注册的不是MyFactoryBean,而是此方法的返回值
public Object getObject() throws Exception {
return new Person();
}

public Class<?> getObjectType() {
return null;
}

public boolean isSingleton() {
return false;
}
}

bean的生命周期

初始化 和 销毁 方法

init

destroy

1
2
3
4
5
6
7
8
9
10
11
12
13
//Person类。。。。
public void init(){
System.out.println("init is executed .....");
}
public void destroy(){
System.out.println("destroy is executed .....");
}
//---------
@Bean(initMethod = "init",destroyMethod = "destroy")
@Scope
public Person person(){
return new Person();
}

note 多实例的bean,容器只能创建bean,不会管理bean,不会调destroy

使用intializingBean和disposableBean
1
2
3
4
5
6
7
8
9
public class Color implements InitializingBean, DisposableBean {
public void destroy() throws Exception {
System.out.println("destroy.....");
}

public void afterPropertiesSet() throws Exception {
System.out.println("init......");
}
}
beanPostProcessor的方式

这种方式在spring中大量使用,重点

bean的后置处理器,在bean的初始化前后做处理工作

1
2
3
4
5
6
7
8
9
10
11
12
13
14
15
16
17
18
19
20
21
22
23
24
public interface BeanPostProcessor {

//Apply this BeanPostProcessor to the given new bean instance before any bean initialization callbacks (like InitializingBean's afterPropertiesSet or a custom init-method).
//初始化之前调
Object postProcessBeforeInitialization(Object bean, String beanName) throws BeansException;

//Apply this BeanPostProcessor to the given new bean instance after any bean initialization callbacks (like InitializingBean's afterPropertiesSet or a custom init-method).
//初始化之后调
Object postProcessAfterInitialization(Object bean, String beanName) throws BeansException;
}
//----------------------------------------------
public class MyBeanPostProcessor implements BeanPostProcessor {
public Object postProcessBeforeInitialization(Object bean, String beanName) throws BeansException {
System.out.println("postProcessBeforeInitialization..." + beanName+" -->" + bean);
//返回的bean可原样返回,也可以包装一些返回
return bean;
}

public Object postProcessAfterInitialization(Object bean, String beanName) throws BeansException {
System.out.println("postProcessAfterInitialization..." + beanName+" -->" + bean);
//返回的bean可原样返回,也可以包装一些返回
return bean;
}
}
beanPostProcessor的工作原理

分析源码:

从容器创建的refresh方法的finishBeanFactoryInitialization中开始切入

比较关键的几个环节

1
2
3
4
5
6
7
8
9
10
11
12
13
14
15
16
17
18
19
20
21
22
23
24
25
26
27
28
29
30
31
32
33
34
35
36
37
//类 AbstractAutowireCapableBeanFactory
protected Object doCreateBean(final String beanName, final RootBeanDefinition mbd, final Object[] args)
throws BeanCreationException {
//.......
}
//给bean进行属性赋值
protected void populateBean(String beanName, RootBeanDefinition mbd, BeanWrapper bw) {
//.........................
}

//note 先populateBean后才进行初始化bean

protected Object initializeBean(final String beanName, final Object bean, RootBeanDefinition mbd) {
//........
//逻辑简单写一下
//1
wrappedBean = applyBeanPostProcessorsBeforeInitialization(wrappedBean, beanName);
//2
invokeInitMethods(beanName, wrappedBean, mbd);
//3
wrappedBean = applyBeanPostProcessorsAfterInitialization(wrappedBean, beanName);

}


public Object applyBeanPostProcessorsBeforeInitialization(Object existingBean, String beanName)
throws BeansException {

Object result = existingBean;
for (BeanPostProcessor beanProcessor : getBeanPostProcessors()) {
result = beanProcessor.postProcessBeforeInitialization(result, beanName);
if (result == null) {
return result;
}
}
return result;
}
beanPostProcessor在spring中大量应用

重点的几个

  • ApplicationContextAwareProcessor

  • InitDestroyAnnotationBeanPostProcessor

    注解@postConstruct和@PreDestroy与这个有关

  • AutowiredAnnotationBeanPostProcessor

spring底层的大量操作,包括bean赋值,注入其他组件,@autowired,生命周期注解,@Async xxxx

都是通过beanPostProcessor的方式来实现的

bean的赋值

@value
1
2
3
4
5
6
7
8
9
10
11
12
13
14
15
16
// 1 基本数值
@Value("zhangsan")
private String name;
// 2 spel: #{}
@Value("#{20-12}")
private String age;
// 3 ${} 取出配置文件中的值
//3.1首先在配置类中配置
@PropertySource(value = {"classpath:/person.properties"})
public class MainConfig {
}
//3.2 然后普通的组件就可以用了
@Value(${person.name})
private String name;


自动装配 @Autowired

spring利用依赖注入DI,完成对ioc容器中各个组件依赖关系的赋值

@Autowired 注入的基本规则
  • 默认优先按照类型去容器中找对应的组件

  • 如果找到多个相同类型的组件,再将属性名称作为组件id去容器中找

  • @Qualifier(BeanId)明确指出要装配的bean

  • 自动装配默认必须要在容器中找到依赖,否则报错;可通过属性required = false取消这个特性

  • 这个注解可以在的位置:构造器,参数,方法,属性

1
2
3
4
5
6
7
8
9
10
11
12
13
14
15
16
17
18
19
20
21
22
23
24
25
26
27
//标注在方法上
//spring创建容器的时候会调用此方法,方法中自定义参数,从ioc容器中获取
@Autowired
public void setCar(Car car) {
this.car = car;
}
//标注在构造器上
//ioc容器中的组件,默认是用无参构造器创建对象,然后再进行赋值操作
//但是使用这种方式,则在创建阶段,寻找组件的依赖关系。
@Autowired
public Boss(Car car){
this.car = car;
}

//注意,如果只有一个有参构造器,则有参构造器的@Autowired可以省略,也能自动装配参数位置的组件
public Boss(Car car){
this.car = car;
}

//注意,@Bean方式注入组件,方法参数的值可以直接从容器中获取,不需要@Autowired
@Bean
public Boss boss(Car car) {
return new Boss(car);
}


  • @Autowired不写的默认规则如上例子,并大量使用不写的方式自动装配依赖
如何使用spring底层的组件,如ApplicationContext BeanFactory etc……

一句话:使用xxxxxAware

1
2
3
4
5
6
7
/** Marker superinterface indicating that a bean is eligible to be notified by the Spring container of a particular framework object through a callback-style method. 
Actual method signature is determined by individual subinterfaces, but should typically consist of just one void-returning method that accepts a single argument.
Note that merely implementing Aware provides no default functionality.
**/
public interface Aware {

}

自定义组件实现xxxxAware,在创建对象的时候,会调用接口规定的方法,注入相关组件。

可参考:ApplicationContextAware、EmbeddedValueResolverAware

每一个xxxxAware,都有其对应的XXXXprocessor

ApplicationContextAware的注入原理
  • ApplicationContextAwareProcessor是BeanPostProcessor,所以其会有BeanPostProcessor的特性,在创建组件的时候给组件赋值,即调用postProcessBeforeInitialization、postProcessAfterInitialization
  • 最关键的逻辑写在postProcessBeforeInitialization中,如下
1
2
3
4
5
6
7
8
9
10
11
12
13
14
15
16
17
18
19
20
21
22
23
24
25
26
27
28
29
30
31
32
33
34
35
36
37
38
39
40
41
42
43
44
45
46
47
48
49
50
51
@Override
public Object postProcessBeforeInitialization(final Object bean, String beanName) throws BeansException {
AccessControlContext acc = null;
//等待创建的bean,如果实现了如下接口,就通过反射方式调用接口中的方法
if (System.getSecurityManager() != null &&
(bean instanceof EnvironmentAware || bean instanceof EmbeddedValueResolverAware ||
bean instanceof ResourceLoaderAware || bean instanceof ApplicationEventPublisherAware ||
bean instanceof MessageSourceAware || bean instanceof ApplicationContextAware)) {
acc = this.applicationContext.getBeanFactory().getAccessControlContext();
}

if (acc != null) {
AccessController.doPrivileged(new PrivilegedAction<Object>() {
@Override
public Object run() {
invokeAwareInterfaces(bean);
return null;
}
}, acc);
}
else {
invokeAwareInterfaces(bean);
}

return bean;
}

private void invokeAwareInterfaces(Object bean) {
if (bean instanceof Aware) {
if (bean instanceof EnvironmentAware) {
((EnvironmentAware) bean).setEnvironment(this.applicationContext.getEnvironment());
}
if (bean instanceof EmbeddedValueResolverAware) {
((EmbeddedValueResolverAware) bean).setEmbeddedValueResolver(this.embeddedValueResolver);
}
if (bean instanceof ResourceLoaderAware) {
((ResourceLoaderAware) bean).setResourceLoader(this.applicationContext);
}
if (bean instanceof ApplicationEventPublisherAware) {
((ApplicationEventPublisherAware) bean).setApplicationEventPublisher(this.applicationContext);
}
if (bean instanceof MessageSourceAware) {
((MessageSourceAware) bean).setMessageSource(this.applicationContext);
}
if (bean instanceof ApplicationContextAware) {
((ApplicationContextAware) bean).setApplicationContext(this.applicationContext);
}
}
}


profile基本使用

spring提供的根据当前环境,动态切换一系列组件的功能

环境:开发、测试、生产

1
2
3
4
5
6
7
8
9
10
11
12
13
14
15
16
17
18
19
20
21
22
23
24
25
26
27
28
29
30
31
32
33
34
@Configuration
public class ProfileConfig {
@Profile("test")
@Bean("dataSourceTest")
public DataSource dataSourceTest(){
ComboPooledDataSource dataSource = new ComboPooledDataSource();
// ....省略配置数据源的过程....
return dataSource;
}
@Profile("dev")
@Bean("dataSourceDev")
public DataSource dataSourceDev(){
ComboPooledDataSource dataSource = new ComboPooledDataSource();
// ....省略配置数据源的过程....
return dataSource;
}
@Profile("prod")
@Bean("dataSourceProd")
public DataSource dataSourceProd(){
ComboPooledDataSource dataSource = new ComboPooledDataSource();
// ....省略配置数据源的过程....
return dataSource;
}
}
// 激活环境
//1 使用命令行参数
//-Dspring.profiles.active=test
// ------------------------
// 2 代码方式
//手动选择profile
applicationContext.getEnvironment().setActiveProfiles("test","dev");
applicationContext.register(ProfileConfig.class);
applicationContext.refresh();

AOP面向切面编程

在程序运行期间,将某段代码切入到指定方法指定位置进行运行的编程方式

底层原理就是 动态代理

aop的相关名词

  • 业务逻辑类
  • 切面类
  • 通知 —> 通知方法 @Before @After @AfterReturning @AfterThrowing
  • 切点
  • 。。。。。
1
2
3
4
5
6
7
8
9
10
11
12
13
14
15
16
17
18
19
20
21
22
23
24
25
26
// 切面 和 不同种类的通知(方法)
@Aspect
public class LogAspect {

@Pointcut("execution(public void com.hhdd.Service.MyService.*(..))")
public void pointcut(){}
@Before("pointcut()")
public void logStart(){
System.out.println("业务开始,记录日志");
}
@After("pointcut()")
public void logEnd(){
System.out.println("业务结束,记录日志");

}
@AfterReturning("pointcut()")
public void logReturn(){
System.out.println("业务返回,记录日志");

}
@AfterThrowing("pointcut()")
public void logException(){
System.out.println("业务异常,记录日志");
}
}

  • 开启aop:将业务类和切面类加入容器中,且配置类上配置@EnableAspectJAutoProxy

AOP原理

注解@EnableAspectJAutoProxy

1
2
3
4
  @Import(AspectJAutoProxyRegistrar.class)
public @interface EnableAspectJAutoProxy {
//...............
}
AspectJAutoProxyRegistrar.class
1
2
3
4
5
6
//这个类是一个 ImportBeanDefinitionRegistrar,可以自定义注册组件
class AspectJAutoProxyRegistrar implements ImportBeanDefinitionRegistrar {
//关键是注册了这个东西 AspectJAnnotationAutoProxyCreator
AopConfigUtils.registerAspectJAnnotationAutoProxyCreatorIfNecessary(registry);
// ....
}
简单记录下registerAspectJAnnotationAutoProxyCreatorIfNecessary的过程
  1. 先看容器中是否有了定义为
1
2
String AUTO_PROXY_CREATOR_BEAN_NAME =
"org.springframework.aop.config.internalAutoProxyCreator";

的组件。有则直接取,没有就创建bean定义信息,注册到组件里头

  1. 创建bean定义信息并注册到容器中
1
2
3
4
5
6
7
//这里的cls是org.springframework.aop.aspectj.annotation.AnnotationAwareAspectJAutoProxyCreator
RootBeanDefinition beanDefinition = new RootBeanDefinition(cls);
beanDefinition.setSource(source);
beanDefinition.getPropertyValues().add("order", Ordered.HIGHEST_PRECEDENCE);
beanDefinition.setRole(BeanDefinition.ROLE_INFRASTRUCTURE);
registry.registerBeanDefinition(AUTO_PROXY_CREATOR_BEAN_NAME, beanDefinition);
return beanDefinition;
组件AnnotationAwareAspectJAutoProxyCreator
继承关系

本质上是一个后置处理器

重点关注后置处理器的处理过程和BeanFactoryAware

重点方法
  1. setBeanFactory
  2. postProcessBeforeInstantiation
  3. postProcessAfterInitialization
setBeanFactory过程

这个方法来源于接口BeanFactoryAware,在实例化bean的时候,setBeanFactory就会被调用。跟踪这个过程,可以看到实例化类AnnotationAwareAspectJAutoProxyCreator的过程。

通过debug形式,分析方法调用栈

1
2
3
4
5
6
7
8
9
10
11
12
13
14
15
16
17
18
19
20
21
22
23
24
25
26
27
28
29
30
31
32
33
34
35
36
37
38
39
40
41
42
43
44
45
46
47
48
49
50
51
52
53
54
55
56
57
58
59
60
61
62
63
64
65
66
67
68
69
70
71
72
73
74
75
76
77
78
79
80
81
82
83
84
// 1.类AnnotationConfigApplicationContext
refresh();
// 2.类AbstractApplicationContext
// Register bean processors that intercept bean creation.
registerBeanPostProcessors(beanFactory);
// 3.类PostProcessorRegistrationDelegate (非完整代码,仅截取关键部分)
public static void registerBeanPostProcessors(ConfigurableListableBeanFactory beanFactory, AbstractApplicationContext applicationContext){
//3.1 按优先级分类容器中的postProcessor
String[] postProcessorNames = beanFactory.getBeanNamesForType(BeanPostProcessor.class, true, false);
List<BeanPostProcessor> priorityOrderedPostProcessors = new ArrayList<BeanPostProcessor>();
List<BeanPostProcessor> internalPostProcessors = new ArrayList<BeanPostProcessor>();
List<String> orderedPostProcessorNames = new ArrayList<String>();
List<String> nonOrderedPostProcessorNames = new ArrayList<String>();
for (String ppName : postProcessorNames) {
if (beanFactory.isTypeMatch(ppName, PriorityOrdered.class)) {
BeanPostProcessor pp = beanFactory.getBean(ppName, BeanPostProcessor.class);
priorityOrderedPostProcessors.add(pp);
if (pp instanceof MergedBeanDefinitionPostProcessor) {
internalPostProcessors.add(pp);
}
}
else if (beanFactory.isTypeMatch(ppName, Ordered.class)) {
orderedPostProcessorNames.add(ppName);
}
else {
nonOrderedPostProcessorNames.add(ppName);
}
}
//3.2 按顺序注册PostProcessor
// First, register the BeanPostProcessors that implement PriorityOrdered.
//....
// Next, register the BeanPostProcessors that implement Ordered.
//...
// Now, register all regular BeanPostProcessors.
....
}
//3.2在getBean的过程中,其实包括了实例化这个bean。此前,容器中只包含bean的定义信息,BeanDefiniton
//ppname 在这里是org.springframework.aop.config.internalAutoProxyCreator
BeanPostProcessor pp = beanFactory.getBean(ppName, BeanPostProcessor.class);
//3.3实例化bean的过程。。。。
//getBean --> doGetBean --> doGetBean
//重点说下doGetBean过程
protected <T> T doGetBean(final String name, final Class<T> requiredType, final Object[] args, boolean typeCheckOnly)
// Eagerly check singleton cache for manually registered singletons.
//检查下cache里是不是有了这个单实例bean
Object sharedInstance = getSingleton(beanName);
//有好几个缓存。。。singletonObjects earlySingletonObjects singletonFactories
//--------------------------------
// Check if bean definition exists in this factory.
//.............
// Create bean instance.
//getSingleton --> singletonFactory.getObject() --> createBean(String beanName, RootBeanDefinition mbd, Object[] args) --> doCreateBean(final String beanName, final RootBeanDefinition mbd, final Object[] args)
//note:createBean中有一个环节需要注意一下
// Give BeanPostProcessors a chance to return a proxy instead of the target bean instance.
Object bean = resolveBeforeInstantiation(beanName, mbdToUse);

//doCreateBean代码截取
// Initialize the bean instance.
//先填充属性,再初始化bean
Object exposedObject = bean;
try {
populateBean(beanName, mbd, instanceWrapper);
if (exposedObject != null) {
exposedObject = initializeBean(beanName, exposedObject, mbd);
}
}
//initializeBean开始
//如果类是这些的aware的实现,其中的方法就会在这里被执行
invokeAwareMethods(beanName, bean);
private void invokeAwareMethods(final String beanName, final Object bean) {
if (bean instanceof Aware) {
if (bean instanceof BeanNameAware) {
((BeanNameAware) bean).setBeanName(beanName);
}
if (bean instanceof BeanClassLoaderAware) {
((BeanClassLoaderAware) bean).setBeanClassLoader(getBeanClassLoader());
}
if (bean instanceof BeanFactoryAware) {
((BeanFactoryAware) bean).setBeanFactory(AbstractAutowireCapableBeanFactory.this);
}
}
//最后,就是setBeanFactory的调用
}

到这里,进入setBeanFactory的流程分析结束

后续呢?继续从initializeBean()方法往下执行

1
2
3
4
5
6
7
8
9
10
11
12
13
14
15
initializeBean(final String beanName, final Object bean, RootBeanDefinition mbd){
//1 invokeAwareMethods(beanName, bean);
//....................

//2 调postProcessor中的PostProcessorsBeforeInitialization
wrappedBean = applyBeanPostProcessorsBeforeInitialization(wrappedBean, beanName);

//3 调初始化方法,像init-method和initializingBean接口中的afterPropertiesSet()
invokeInitMethods(beanName, wrappedBean, mbd);

//4 调postProcessor中的PostProcessorsAfterInitialization
wrappedBean = applyBeanPostProcessorsAfterInitialization(wrappedBean, beanName);

//到此,实例化bean完成,即AnnotationAwareAspectJAutoProxyCreator创建完成
}

类AbstractAdvisorAutoProxyCreator的setBeanFactory方法分析

1
2
3
4
5
6
7
8
public void setBeanFactory(BeanFactory beanFactory) {
super.setBeanFactory(beanFactory);
if (!(beanFactory instanceof ConfigurableListableBeanFactory)) {
throw new IllegalArgumentException(
"AdvisorAutoProxyCreator requires a ConfigurableListableBeanFactory: " + beanFactory);
}
initBeanFactory((ConfigurableListableBeanFactory) beanFactory);
}
1
2
3
4
5
6
7
8
9
10
protected void initBeanFactory(ConfigurableListableBeanFactory beanFactory) {
super.initBeanFactory(beanFactory);
if (this.aspectJAdvisorFactory == null) {
//创建aspectJAdvisorFactory
this.aspectJAdvisorFactory = new ReflectiveAspectJAdvisorFactory(beanFactory);
}
//重新包装一层
this.aspectJAdvisorsBuilder =
new BeanFactoryAspectJAdvisorsBuilderAdapter(beanFactory, this.aspectJAdvisorFactory);
}
postProcessBeforeInstantiation

这个方法来自接口InstantiationAwareBeanPostProcessor

分析进入这个方法的过程

1
2
3
4
5
6
7
8
9
10
11
12
13
14
15
//类AbstractApplicationContext
// Instantiate all remaining (non-lazy-init) singletons.
finishBeanFactoryInitialization(beanFactory);
// 遍历获取容器中所有bean,依次创建对象
getBean --> doGetBean --> getSingleton --> createBean
//重点createBean()
protected Object createBean(String beanName, RootBeanDefinition mbd, Object[] args) throws BeanCreationException {

// Give BeanPostProcessors a chance to return a proxy instead of the target bean instance.
//后置处理器先尝试返回对象
Object bean = resolveBeforeInstantiation(beanName, mbdToUse);
if (bean != null) {
return bean;
}
}
1
2
3
4
5
6
7
8
9
10
11
12
13
14
15
16
17
18
19
20
21
22
23
24
25
26
27
28
protected Object resolveBeforeInstantiation(String beanName, RootBeanDefinition mbd) {
//。。。。。。。。。。。。。。。
Class<?> targetType = determineTargetType(beanName, mbd);
if (targetType != null) {
//1.。。。。
bean = applyBeanPostProcessorsBeforeInstantiation(targetType, beanName);
if (bean != null) {
//2.。。。。。。
bean = applyBeanPostProcessorsAfterInitialization(bean, beanName);
}

}

}
//applyBeanPostProcessorsBeforeInstantiation的过程
protected Object applyBeanPostProcessorsBeforeInstantiation(Class<?> beanClass, String beanName) {
for (BeanPostProcessor bp : getBeanPostProcessors()) {
if (bp instanceof InstantiationAwareBeanPostProcessor) {
InstantiationAwareBeanPostProcessor ibp = (InstantiationAwareBeanPostProcessor) bp;
Object result = ibp.postProcessBeforeInstantiation(beanClass, beanName);
if (result != null) {
return result;
}
}
}
return null;
}
//最后就进入了postProcessBeforeInstantiation

组件AnnotationAwareAspectJAutoProxyCreator实现了InstantiationAwareBeanPostProcessor,也就是说,容器中任何一个(不严谨)bean在实例化的时候,会被这个组件拦截,都会先通过这个组件,让这个组件尝试直接返回bean。

类AnnotationAwareAspectJAutoProxyCreator的postProcessBeforeInstantiation做了什么

1
2
3
4
5
6
7
8
9
10
11
12
13
14
15
16
17
18
19
20
21
22
23
24
25
26
27
28
29
public Object postProcessBeforeInstantiation(Class<?> beanClass, String beanName) throws BeansException {
Object cacheKey = getCacheKey(beanClass, beanName);

if (beanName == null || !this.targetSourcedBeans.contains(beanName)) {
if (this.advisedBeans.containsKey(cacheKey)) {
return null;
}
if (isInfrastructureClass(beanClass) || shouldSkip(beanClass, beanName)) {
this.advisedBeans.put(cacheKey, Boolean.FALSE);
return null;
}
}

// Create proxy here if we have a custom TargetSource.
// Suppresses unnecessary default instantiation of the target bean:
// The TargetSource will handle target instances in a custom fashion.
if (beanName != null) {
TargetSource targetSource = getCustomTargetSource(beanClass, beanName);
if (targetSource != null) {
this.targetSourcedBeans.add(beanName);
Object[] specificInterceptors = getAdvicesAndAdvisorsForBean(beanClass, beanName, targetSource);
Object proxy = createProxy(beanClass, beanName, specificInterceptors, targetSource);
this.proxyTypes.put(cacheKey, proxy.getClass());
return proxy;
}
}

return null;
}
postProcessAfterInitialization

进入到这一步,说明是从doCreateBean中进入的

类AnnotationAwareAspectJAutoProxyCreator的postProcessAfterInitialization

1
2
3
4
5
6
7
8
9
10
11
12
13
14
15
16
17
18
19
20
21
22
23
24
25
26
27
28
29
30
31
32
33
34
35
36
37
public Object postProcessAfterInitialization(Object bean, String beanName) throws BeansException {
if (bean != null) {
Object cacheKey = getCacheKey(bean.getClass(), beanName);
if (!this.earlyProxyReferences.contains(cacheKey)) {
return wrapIfNecessary(bean, beanName, cacheKey);
}
}
return bean;
}
//最终返回增强过的代理对象
protected Object wrapIfNecessary(Object bean, String beanName, Object cacheKey) {
if (beanName != null && this.targetSourcedBeans.contains(beanName)) {
return bean;
}
if (Boolean.FALSE.equals(this.advisedBeans.get(cacheKey))) {
return bean;
}
if (isInfrastructureClass(bean.getClass()) || shouldSkip(bean.getClass(), beanName)) {
this.advisedBeans.put(cacheKey, Boolean.FALSE);
return bean;
}

// Create proxy if we have advice.
// 重点
Object[] specificInterceptors = getAdvicesAndAdvisorsForBean(bean.getClass(), beanName, null);
if (specificInterceptors != DO_NOT_PROXY) {
this.advisedBeans.put(cacheKey, Boolean.TRUE);
//重点
Object proxy = createProxy(
bean.getClass(), beanName, specificInterceptors, new SingletonTargetSource(bean));
this.proxyTypes.put(cacheKey, proxy.getClass());
return proxy;
}

this.advisedBeans.put(cacheKey, Boolean.FALSE);
return bean;
}

如何判断切点类型的advisor是否可以作用于当前的bean,在AopUtil类的canApply中做处理

1
2
3
4
5
6
7
8
9
10
11
12
13
14
15
16
17
18
19
20
21
22
23
24
25
26
27
28
29
30
31
32
public static boolean canApply(Pointcut pc, Class<?> targetClass, boolean hasIntroductions) {
Assert.notNull(pc, "Pointcut must not be null");
if (!pc.getClassFilter().matches(targetClass)) {
return false;
}

MethodMatcher methodMatcher = pc.getMethodMatcher();
if (methodMatcher == MethodMatcher.TRUE) {
// No need to iterate the methods if we're matching any method anyway...
return true;
}

IntroductionAwareMethodMatcher introductionAwareMethodMatcher = null;
if (methodMatcher instanceof IntroductionAwareMethodMatcher) {
introductionAwareMethodMatcher = (IntroductionAwareMethodMatcher) methodMatcher;
}

Set<Class<?>> classes = new LinkedHashSet<Class<?>>(ClassUtils.getAllInterfacesForClassAsSet(targetClass));
classes.add(targetClass);
for (Class<?> clazz : classes) {
Method[] methods = ReflectionUtils.getAllDeclaredMethods(clazz);
for (Method method : methods) {
if ((introductionAwareMethodMatcher != null &&
introductionAwareMethodMatcher.matches(method, targetClass, hasIntroductions)) ||
methodMatcher.matches(method, targetClass)) {
return true;
}
}
}

return false;
}
1
2
3
4
5
6
7
8
9
10
11
12
13
14
15
16
17
18
19
20
21
22
23
24
25
26
27
28
29
30
31
protected Object createProxy(
Class<?> beanClass, String beanName, Object[] specificInterceptors, TargetSource targetSource) {

if (this.beanFactory instanceof ConfigurableListableBeanFactory) {
AutoProxyUtils.exposeTargetClass((ConfigurableListableBeanFactory) this.beanFactory, beanName, beanClass);
}

ProxyFactory proxyFactory = new ProxyFactory();
proxyFactory.copyFrom(this);

if (!proxyFactory.isProxyTargetClass()) {
if (shouldProxyTargetClass(beanClass, beanName)) {
proxyFactory.setProxyTargetClass(true);
}
else {
evaluateProxyInterfaces(beanClass, proxyFactory);
}
}

Advisor[] advisors = buildAdvisors(beanName, specificInterceptors);
proxyFactory.addAdvisors(advisors);
proxyFactory.setTargetSource(targetSource);
customizeProxyFactory(proxyFactory);

proxyFactory.setFrozen(this.freezeProxy);
if (advisorsPreFiltered()) {
proxyFactory.setPreFiltered(true);
}

return proxyFactory.getProxy(getProxyClassLoader());
}
1
2
3
4
5
6
7
8
9
10
11
12
13
14
15
16
public AopProxy createAopProxy(AdvisedSupport config) throws AopConfigException {
if (config.isOptimize() || config.isProxyTargetClass() || hasNoUserSuppliedProxyInterfaces(config)) {
Class<?> targetClass = config.getTargetClass();
if (targetClass == null) {
throw new AopConfigException("TargetSource cannot determine target class: " +
"Either an interface or a target is required for proxy creation.");
}
if (targetClass.isInterface() || Proxy.isProxyClass(targetClass)) {
return new JdkDynamicAopProxy(config);
}
return new ObjenesisCglibAopProxy(config);
}
else {
return new JdkDynamicAopProxy(config);
}
}

两种形式的代理对象

  • JdkDynamicAopProxy
  • ObjenesisCglibAopProxy

spring可以自动决定

1
2
3
4
5
6
7
8
9
10
11
12
13
14
15
16
public AopProxy createAopProxy(AdvisedSupport config) throws AopConfigException {
if (config.isOptimize() || config.isProxyTargetClass() || hasNoUserSuppliedProxyInterfaces(config)) {
Class<?> targetClass = config.getTargetClass();
if (targetClass == null) {
throw new AopConfigException("TargetSource cannot determine target class: " +
"Either an interface or a target is required for proxy creation.");
}
if (targetClass.isInterface() || Proxy.isProxyClass(targetClass)) {
return new JdkDynamicAopProxy(config);
}
return new ObjenesisCglibAopProxy(config);
}
else {
return new JdkDynamicAopProxy(config);
}
}

在自己下的example代码中,MyService经过springAop的增强,容器中的对象,实际上是经过cglib增强过的代理对象。以后只要是从容器中获取MyService组件的,都是获取到代理对象。

AOP拦截器链

容器中保存的组件是增强后的的代理对象,对象里保存了详细信息(包括增强器,目标对象等等)

调用代理对象的方法时,会经过aop拦截器链的处理

intercept

CglibAopProxy的intercept

  • 获取拦截器链
1
List<Object> chain = this.advised.getInterceptorsAndDynamicInterceptionAdvice(method, targetClass);
  • 没有拦截器链,直接执行目标方法,有则
1
retVal = new CglibMethodInvocation(proxy, target, method, args, targetClass, chain, methodProxy).proceed();
获取拦截器链过程
1
2
3
4
5
6
7
8
9
10
11
12
13
14
15
16
17
18
19
20
21
22
23
24
25
26
27
28
29
30
31
32
33
34
35
36
37
38
39
40
41
42
43
44
45
46
47
public List<Object> getInterceptorsAndDynamicInterceptionAdvice(
Advised config, Method method, Class<?> targetClass) {

// This is somewhat tricky... We have to process introductions first,
// but we need to preserve order in the ultimate list.
List<Object> interceptorList = new ArrayList<Object>(config.getAdvisors().length);
Class<?> actualClass = (targetClass != null ? targetClass : method.getDeclaringClass());
boolean hasIntroductions = hasMatchingIntroductions(config, actualClass);
AdvisorAdapterRegistry registry = GlobalAdvisorAdapterRegistry.getInstance();

for (Advisor advisor : config.getAdvisors()) {
if (advisor instanceof PointcutAdvisor) {
// Add it conditionally.
PointcutAdvisor pointcutAdvisor = (PointcutAdvisor) advisor;
if (config.isPreFiltered() || pointcutAdvisor.getPointcut().getClassFilter().matches(actualClass)) {
//包装成MethodInterceptor
MethodInterceptor[] interceptors = registry.getInterceptors(advisor);
MethodMatcher mm = pointcutAdvisor.getPointcut().getMethodMatcher();
if (MethodMatchers.matches(mm, method, actualClass, hasIntroductions)) {
if (mm.isRuntime()) {
// Creating a new object instance in the getInterceptors() method
// isn't a problem as we normally cache created chains.
for (MethodInterceptor interceptor : interceptors) {
interceptorList.add(new InterceptorAndDynamicMethodMatcher(interceptor, mm));
}
}
else {
interceptorList.addAll(Arrays.asList(interceptors));
}
}
}
}
else if (advisor instanceof IntroductionAdvisor) {
IntroductionAdvisor ia = (IntroductionAdvisor) advisor;
if (config.isPreFiltered() || ia.getClassFilter().matches(actualClass)) {
Interceptor[] interceptors = registry.getInterceptors(advisor);
interceptorList.addAll(Arrays.asList(interceptors));
}
}
else {
Interceptor[] interceptors = registry.getInterceptors(advisor);
interceptorList.addAll(Arrays.asList(interceptors));
}
}

return interceptorList;
}
拦截器链调用过程

以MyService类的doSomething()调用做例子

其调用经过的拦截器链,如下图所示

// 待补充…….

1
2
3
4
5
6
7
8
9
10
11
12
13
14
15
16
17
18
19
20
21
22
23
24
25
26
27
28
public Object proceed() throws Throwable {
// We start with an index of -1 and increment early.
if (this.currentInterceptorIndex == this.interceptorsAndDynamicMethodMatchers.size() - 1) {
return invokeJoinpoint();
}

Object interceptorOrInterceptionAdvice =
this.interceptorsAndDynamicMethodMatchers.get(++this.currentInterceptorIndex);
if (interceptorOrInterceptionAdvice instanceof InterceptorAndDynamicMethodMatcher) {
// Evaluate dynamic method matcher here: static part will already have
// been evaluated and found to match.
InterceptorAndDynamicMethodMatcher dm =
(InterceptorAndDynamicMethodMatcher) interceptorOrInterceptionAdvice;
if (dm.methodMatcher.matches(this.method, this.targetClass, this.arguments)) {
return dm.interceptor.invoke(this);
}
else {
// Dynamic matching failed.
// Skip this interceptor and invoke the next in the chain.
return proceed();
}
}
else {
// It's an interceptor, so we just invoke it: The pointcut will have
// been evaluated statically before this object was constructed.
return ((MethodInterceptor) interceptorOrInterceptionAdvice).invoke(this);
}
}

链式获取每一个拦截器,拦截器执行invoke方法,每一个拦截器等待下一个拦截器执行完成返回再执行

通过拦截器链机制,保证通知方法和目标方法的执行顺序。

spring中的事务

基本使用

dao类

1
2
3
4
5
6
7
8
9
10
11
12
13
14
15
16
17
18
@Repository
public class AccountDao {
@Autowired
private JdbcTemplate jdbcTemplate;

public List<Map<String, Object>> select() {
String sql = "select * from account";
List<Map<String, Object>> results = jdbcTemplate.queryForList(sql);
return results;
}

@Transactional
public void insert() {
String sql = "insert into account (name,money) values('huanghedidi',18.5)";
int count = jdbcTemplate.update(sql);
System.out.println("更新了" + count + "条记录");
}
}

config类

1
2
3
4
5
6
7
8
9
10
11
12
13
14
15
16
17
18
19
20
21
22
23
24
25
26
27
@Configuration
@ComponentScan(basePackages = {"com.hhdd.dao", "com.hhdd.service"})
@EnableTransactionManagement
public class TXConfig {

@Bean
public DataSource dataSource() throws PropertyVetoException {
ComboPooledDataSource dataSource = new ComboPooledDataSource();
dataSource.setUser("root");
dataSource.setPassword("root");
dataSource.setDriverClass("com.mysql.jdbc.Driver");
dataSource.setJdbcUrl("jdbc:mysql://192.168.153.8:3306/ssm");
return dataSource;
}

@Bean
public JdbcTemplate jdbcTemplate(DataSource dataSource) {
JdbcTemplate jdbcTemplate = new JdbcTemplate(dataSource);
return jdbcTemplate;
}

@Bean
public PlatformTransactionManager transactionManager(DataSource dataSource) {
DataSourceTransactionManager dataSourceTransactionManager = new DataSourceTransactionManager(dataSource);
return dataSourceTransactionManager;
}
}

spring事务的原理

使用了注解@EnableTransactionManagement,这个注解引入了@Import(TransactionManagementConfigurationSelector.class)

类TransactionManagementConfigurationSelector导入的组件,如下

1
2
3
4
5
6
7
8
9
10
11
12
13
14
15
16
17
18
19
20
21
//根据adviceMode决定要导入的组件
protected String[] selectImports(AdviceMode adviceMode) {
switch (adviceMode) {
case PROXY:
return new String[] {AutoProxyRegistrar.class.getName(), ProxyTransactionManagementConfiguration.class.getName()};
case ASPECTJ:
return new String[] {TransactionManagementConfigUtils.TRANSACTION_ASPECT_CONFIGURATION_CLASS_NAME};
default:
return null;
}
}

//---------------
//adviceMode来源于类EnableTransactionManagement
//默认是PROXY
/**
* Indicate how transactional advice should be applied. The default is
* {@link AdviceMode#PROXY}.
* @see AdviceMode
*/
AdviceMode mode() default AdviceMode.PROXY;

引入的AutoProxyRegistrar又注册了一些bean

1
2
3
4
5
6
7
8
9
10
11
12
13
14
15
16
17
18
19
20
21
22
23
24
25
26
27
28
29
30
31
32
33
34
35
public void registerBeanDefinitions(AnnotationMetadata importingClassMetadata, BeanDefinitionRegistry registry) {
boolean candidateFound = false;
Set<String> annoTypes = importingClassMetadata.getAnnotationTypes();
for (String annoType : annoTypes) {
AnnotationAttributes candidate = AnnotationConfigUtils.attributesFor(importingClassMetadata, annoType);
if (candidate == null) {
continue;
}
Object mode = candidate.get("mode");
Object proxyTargetClass = candidate.get("proxyTargetClass");
if (mode != null && proxyTargetClass != null && AdviceMode.class == mode.getClass() &&
Boolean.class == proxyTargetClass.getClass()) {
candidateFound = true;
if (mode == AdviceMode.PROXY) {
//注册AutoProxyCreator
AopConfigUtils.registerAutoProxyCreatorIfNecessary(registry);
if ((Boolean) proxyTargetClass) {
AopConfigUtils.forceAutoProxyCreatorToUseClassProxying(registry);
return;
}
}
}
}
if (!candidateFound) {
String name = getClass().getSimpleName();
logger.warn(String.format("%s was imported but no annotations were found " +
"having both 'mode' and 'proxyTargetClass' attributes of type " +
"AdviceMode and boolean respectively. This means that auto proxy " +
"creator registration and configuration may not have occurred as " +
"intended, and components may not be proxied as expected. Check to " +
"ensure that %s has been @Import'ed on the same class where these " +
"annotations are declared; otherwise remove the import of %s " +
"altogether.", name, name, name));
}
}
1
2
3
4
5
6
7
8
9
10
11
12
13
14
15
16
17
18
19
20
21
//这里的class是InfrastructureAdvisorAutoProxyCreator.class
private static BeanDefinition registerOrEscalateApcAsRequired(Class<?> cls, BeanDefinitionRegistry registry, Object source) {
Assert.notNull(registry, "BeanDefinitionRegistry must not be null");
if (registry.containsBeanDefinition(AUTO_PROXY_CREATOR_BEAN_NAME)) {
BeanDefinition apcDefinition = registry.getBeanDefinition(AUTO_PROXY_CREATOR_BEAN_NAME);
if (!cls.getName().equals(apcDefinition.getBeanClassName())) {
int currentPriority = findPriorityForClass(apcDefinition.getBeanClassName());
int requiredPriority = findPriorityForClass(cls);
if (currentPriority < requiredPriority) {
apcDefinition.setBeanClassName(cls.getName());
}
}
return null;
}
RootBeanDefinition beanDefinition = new RootBeanDefinition(cls);
beanDefinition.setSource(source);
beanDefinition.getPropertyValues().add("order", Ordered.HIGHEST_PRECEDENCE);
beanDefinition.setRole(BeanDefinition.ROLE_INFRASTRUCTURE);
registry.registerBeanDefinition(AUTO_PROXY_CREATOR_BEAN_NAME, beanDefinition);
return beanDefinition;
}

事务实现的重点就是这个组件:InfrastructureAdvisorAutoProxyCreator

InfrastructureAdvisorAutoProxyCreator

继承结构如下

可以看到和aop原理中导入的组件AnnotationAwareAspectJAutoProxyCreator是类似的

关键的是实现了InstantiationAwareBeanPostProcessor接口,容器在实例化bean的时候,会被这个组件拦截,这个组件可以尝试直接返回bean(代理对象)

ProxyTransactionManagementConfiguration

这个是一个配置类

给容器注册一些组件

  • BeanFactoryTransactionAttributeSourceAdvisor
  • TransactionAttributeSource
  • TransactionInterceptor 是一个MethosInteceptor

关键的是类TransactionInterceptor 的invokeWithinTransaction方法

1
2
3
4
5
6
7
8
9
10
11
12
13
14
15
16
17
18
19
20
21
22
23
24
25
26
27
28
29
30
31
32
33
34
35
36
37
38
39
40
41
42
43
44
45
46
47
48
49
50
51
52
53
54
55
56
57
58
59
60
61
62
63
64
65
66
67
68
69
70
71
72
73
74
protected Object invokeWithinTransaction(Method method, Class<?> targetClass, final InvocationCallback invocation)
throws Throwable {

// If the transaction attribute is null, the method is non-transactional.
final TransactionAttribute txAttr = getTransactionAttributeSource().getTransactionAttribute(method, targetClass);
final PlatformTransactionManager tm = determineTransactionManager(txAttr);
final String joinpointIdentification = methodIdentification(method, targetClass, txAttr);

if (txAttr == null || !(tm instanceof CallbackPreferringPlatformTransactionManager)) {
// Standard transaction demarcation with getTransaction and commit/rollback calls.
TransactionInfo txInfo = createTransactionIfNecessary(tm, txAttr, joinpointIdentification);
Object retVal = null;
try {
// This is an around advice: Invoke the next interceptor in the chain.
// This will normally result in a target object being invoked.
retVal = invocation.proceedWithInvocation();
}
catch (Throwable ex) {
// target invocation exception
completeTransactionAfterThrowing(txInfo, ex);
throw ex;
}
finally {
cleanupTransactionInfo(txInfo);
}
commitTransactionAfterReturning(txInfo);
return retVal;
}

else {
// It's a CallbackPreferringPlatformTransactionManager: pass a TransactionCallback in.
try {
Object result = ((CallbackPreferringPlatformTransactionManager) tm).execute(txAttr,
new TransactionCallback<Object>() {
@Override
public Object doInTransaction(TransactionStatus status) {
TransactionInfo txInfo = prepareTransactionInfo(tm, txAttr, joinpointIdentification, status);
try {
return invocation.proceedWithInvocation();
}
catch (Throwable ex) {
if (txAttr.rollbackOn(ex)) {
// A RuntimeException: will lead to a rollback.
if (ex instanceof RuntimeException) {
throw (RuntimeException) ex;
}
else {
throw new ThrowableHolderException(ex);
}
}
else {
// A normal return value: will lead to a commit.
return new ThrowableHolder(ex);
}
}
finally {
cleanupTransactionInfo(txInfo);
}
}
});

// Check result: It might indicate a Throwable to rethrow.
if (result instanceof ThrowableHolder) {
throw ((ThrowableHolder) result).getThrowable();
}
else {
return result;
}
}
catch (ThrowableHolderException ex) {
throw ex.getCause();
}
}
}

spring其他的扩展原理

BeanFactoryPostProcessor

名称上,与BeanPostProcessor有点像

调用的时机:在BeanFactory标准初始化后调用

1
2
3
4
5
6
7
8
9
10
/**
* Modify the application context's internal bean factory after its standard
* initialization. All bean definitions will have been loaded, but no beans
* will have been instantiated yet. This allows for overriding or adding
* properties even to eager-initializing beans.
* @param beanFactory the bean factory used by the application context
* @throws org.springframework.beans.BeansException in case of errors
*/
//所有的bean定义已经加载,但是bean还没有实例化的时候
void postProcessBeanFactory(ConfigurableListableBeanFactory beanFactory) throws BeansException;

执行过程分析

  1. // Invoke factory processors registered as beans in the context.
    invokeBeanFactoryPostProcessors(beanFactory);
    
    1
    2
    3
    4
    5
    6
    7
    8
    9

    2. ```java
    private static void invokeBeanFactoryPostProcessors(
    Collection<? extends BeanFactoryPostProcessor> postProcessors, ConfigurableListableBeanFactory beanFactory) {
    //遍历容器中所有的BeanFactoryPostProcessor执行其中的方法
    for (BeanFactoryPostProcessor postProcessor : postProcessors) {
    postProcessor.postProcessBeanFactory(beanFactory);
    }
    }

典型的例子 BeanDefinitionRegistryPostProcessor接口

这个接口在BeanFactoryPostProcessor基础上,新增了一个方法

1
2
3
4
5
6
7
8
9
10
/**
* Modify the application context's internal bean definition registry after its
* standard initialization. All regular bean definitions will have been loaded,
* but no beans will have been instantiated yet. This allows for adding further
* bean definitions before the next post-processing phase kicks in.
* @param registry the bean definition registry used by the application context
* @throws org.springframework.beans.BeansException in case of errors
*/
//在bean定义还没有被加载的时候执行
void postProcessBeanDefinitionRegistry(BeanDefinitionRegistry registry) throws BeansException;

优先于BeanFactoryPostProcessor执行

ApplicationListener

监听容器中发布的事件,事件驱动开发

基本使用

定义事件

1
2
3
4
5
6
7
8
9
10
public class MyApplicationEvent extends ApplicationEvent {
/**
* Create a new ApplicationEvent.
*
* @param source the object on which the event initially occurred (never {@code null})
*/
public MyApplicationEvent(Object source) {
super(source);
}
}

监听事件

1
2
3
4
5
public class MyApplicationListener implements ApplicationListener<ApplicationEvent> {
public void onApplicationEvent(ApplicationEvent event) {
System.out.println("收到的事件是:" + event);
}
}

发布事件

1
2
3
4
5
public void test1() {
AnnotationConfigApplicationContext applicationContext = new AnnotationConfigApplicationContext(ExtConfig.class);
MyApplicationEvent myApplicationEvent = new MyApplicationEvent("自定义事件");
applicationContext.publishEvent(myApplicationEvent);
}

原理

ContextRefreshedEvent事件

refresh()

finishRefresh();

1
2
3
4
5
6
7
8
9
10
11
12
13
14
15
16
17
18
19
20
21
22
23
24
// Publish the final event.
publishEvent(new ContextRefreshedEvent(this));
//事件发布的流程
//1 获取事件多播器:getApplicationEventMulticaster()
//2 派发事件
public void multicastEvent(final ApplicationEvent event, ResolvableType eventType) {
ResolvableType type = (eventType != null ? eventType : resolveDefaultEventType(event));
for (final ApplicationListener<?> listener : getApplicationListeners(event, type)) {
//有线程池,可支持异步执行
Executor executor = getTaskExecutor();
if (executor != null) {
executor.execute(new Runnable() {
@Override
public void run() {
invokeListener(listener, event);
}
});
}
else {
invokeListener(listener, event);
}
}
}

MyApplicationEvent事件

自己调用publishEvent方法

过程和上面是类是的,都是得到多播器,用多播器遍历所有的listener来回调listener的onApplicationEvent(event)逻辑

事件多播器ApplicationEventMulticaster

创建的时机

1
2
// Initialize event multicaster for this context.
initApplicationEventMulticaster();

@EventListener

基本使用

1
2
3
4
5
6
7
@Service
public class MyService {
@EventListener(classes = {ApplicationEvent.class})
public void doSomething(ApplicationEvent applicationEvent){
System.out.println("doSomething.... "+applicationEvent);
}
}

原理

使用EventListenerMethodProcessor来解析方法上的@EventListener

EventListenerMethodProcessor实现了接口SmartInitializingSingleton

SmartInitializingSingleton
1
2
3
4
5
6
7
8
9
10
11
12
13
14
15
16
public interface SmartInitializingSingleton {

/**
* Invoked right at the end of the singleton pre-instantiation phase,
* with a guarantee that all regular singleton beans have been created
* already. {@link ListableBeanFactory#getBeansOfType} calls within
* this method won't trigger accidental side effects during bootstrap.
* <p><b>NOTE:</b> This callback won't be triggered for singleton beans
* lazily initialized on demand after {@link BeanFactory} bootstrap,
* and not for any other bean scope either. Carefully use it for beans
* with the intended bootstrap semantics only.
*/
//调用时机:所有单实例bean已经被初始化完成的时候调用
void afterSingletonsInstantiated();

}

触发流程分析

  • ioc容器创建并refresh

  • finishBeanFactoryInitialization(beanFactory);初始化剩下的单实例bean

  • beanFactory.preInstantiateSingletons();

    1
    2
    3
    4
    5
    6
    7
    8
    9
    10
    11
    12
    13
    14
    15
    16
    17
    18
    19
    20
    21
    22
    23
    24
    25
    26
    27
    28
    29
    30
    31
    32
    33
    34
    35
    36
    37
    38
    39
    40
    41
    42
    43
    44
    45
    46
    47
    48
    49
    50
    51
    52
    53
    54
    55
    56
    57
    58
    59
    public void preInstantiateSingletons() throws BeansException {
    if (this.logger.isDebugEnabled()) {
    this.logger.debug("Pre-instantiating singletons in " + this);
    }

    // Iterate over a copy to allow for init methods which in turn register new bean definitions.
    // While this may not be part of the regular factory bootstrap, it does otherwise work fine.
    List<String> beanNames = new ArrayList<String>(this.beanDefinitionNames);

    // Trigger initialization of all non-lazy singleton beans...
    for (String beanName : beanNames) {
    RootBeanDefinition bd = getMergedLocalBeanDefinition(beanName);
    if (!bd.isAbstract() && bd.isSingleton() && !bd.isLazyInit()) {
    if (isFactoryBean(beanName)) {
    final FactoryBean<?> factory = (FactoryBean<?>) getBean(FACTORY_BEAN_PREFIX + beanName);
    boolean isEagerInit;
    if (System.getSecurityManager() != null && factory instanceof SmartFactoryBean) {
    isEagerInit = AccessController.doPrivileged(new PrivilegedAction<Boolean>() {
    @Override
    public Boolean run() {
    return ((SmartFactoryBean<?>) factory).isEagerInit();
    }
    }, getAccessControlContext());
    }
    else {
    isEagerInit = (factory instanceof SmartFactoryBean &&
    ((SmartFactoryBean<?>) factory).isEagerInit());
    }
    if (isEagerInit) {
    getBean(beanName);
    }
    }
    else {
    getBean(beanName);
    }
    }
    }

    // Trigger post-initialization callback for all applicable beans...
    //在这里调用...............
    for (String beanName : beanNames) {
    Object singletonInstance = getSingleton(beanName);
    if (singletonInstance instanceof SmartInitializingSingleton) {
    final SmartInitializingSingleton smartSingleton = (SmartInitializingSingleton) singletonInstance;
    if (System.getSecurityManager() != null) {
    AccessController.doPrivileged(new PrivilegedAction<Object>() {
    @Override
    public Object run() {
    smartSingleton.afterSingletonsInstantiated();
    return null;
    }
    }, getAccessControlContext());
    }
    else {
    smartSingleton.afterSingletonsInstantiated();
    }
    }
    }
    }

spring容器创建过程

这个是重点

Refresh

流程分析

  • prepareRefresh();刷新前预处理工作

    • InitPropertySources();初始化一些属性,留给子类使用
    • getEnvironment().validateRequiredProperties(); 进行属性校验
    • this.earlyApplicationEvents = new LinkedHashSet();保存早期的事件
  • obtainFreshBeanFactory();获取BeanFactory

    • refreshBeanFactory();刷新BeanFactory,设置id
    • ConfigurableListableBeanFactory beanFactory = getBeanFactory();在this()时候已经创建了BeanFactory,这个时候将其返回
  • prepareBeanFactory(beanFactory);//BeanFactory的预准备工作

    • 设置类加载器,表达式解析器…………..
    • 添加部分BeanPostProcessor,例如ApplicationContextAwareProcessor
    • 设置忽略的一些自动装配接口,例如EnvironmentAware等等
    • 注册可以解析的自动装配,能在任何组件中自动注入,例如BeanFactory、ResourceLoader、ApplicationEventPublisher、ApplicationContext
    • 注册一些组件,例如StandardEnvironment、systemProperties、systemEnvironment
  • postProcessBeanFactory(beanFactory);子类通过重写此方法来进行设置

—————————–以上是beanFactory的创建以及准备工作——————————

  • invokeBeanFactoryPostProcessors(beanFactory);

    • BeanFactoryPostProcessor在BeanFactory准备完成后,开始执行
    • 两个接口:BeanFactoryPostProcessor和BeanDefinitionRegistryPostProcessor
    • 先处理BeanDefinitionRegistryPostProcessor,调用postProcessBeanDefinitionRegistry(registry)
    • 再处理BeanFactoryPostProcessor,调用postProcessBeanFactory(beanFactory)
  • registerBeanPostProcessors(beanFactory);

    • 重点BeanPostProcessor:DestructionAwareBeanPostProcessor、InstantiationAwareBeanPostProcessor、SmartInstantiationAwareBeanPostProcessor、MergedBeanDefinitionPostProcessor
    • 不同的BeanPostProcessor的执行时机是不一样的
    • 注册BeanPostProcessorChecker
    • 按照BeanPostProcessor的优先级顺序,注册BeanPostProcessor
    • 最后,再一次注册internal BeanPostProcessors,这个指的是类型为MergedBeanDefinitionPostProcessor。为什么说再一次呢?因为前面按优先级注册的时候,可能已经注册过了
    • 注册ApplicationListenerDetector组件,为了放在chain的最后一个位置。用于监听ApplicationListener的组件注册,如果是则放到ApplicationContext的applicationListeners中
  • initMessageSource();mvc中初始化messageSource(用于国际化等等)

  • initApplicationEventMulticaster();事件多播器

  • onRefresh();留给子类进行重写

  • registerListeners();

    • 将容器中的每个ApplicatonListener添加到事件多播器中
    • 派发早期已经在容器中注册的事件
  • finishBeanFactoryInitialization(beanFactory);重要!!!初始化所有剩下的bean

    • beanFactory.preInstantiateSingletons();
    • 获取bean的定义信息
    • 当bean是单实例,非懒加载,则开始实例化bean
    • getBean() –> doGetBean(name, null, null, false);
    • doGetBean的创建细节
      • 标上已经创建的标记
      • 获取bean定义的dependsOn,即依赖其他的bean。如果有,则需要先getBean依赖的组件
      • 启动单实例bean的创建流程
        • Object bean = resolveBeforeInstantiation(beanName, mbdToUse);让BeanPostProcessor尝试返回代理对象
          • 提前执行InstantiationAwareBeanPostProcessor的逻辑
        • 如果没有返回代理对象,则正式进入创建流程
        • 如果是最普通的方式注入的bean,会通过反射获取构造器对象来实例化bean
        • applyMergedBeanDefinitionPostProcessors(mbd, beanType, beanName);应用后置处理器
        • populateBean(beanName, mbd, instanceWrapper);
          • 赋值之前,拿到InstantiationAwareBeanPostProcessor,调用postProcessAfterInstantiation方法
          • 赋值之前,拿到InstantiationAwareBeanPostProcessor,调用postProcessPropertyValues方法
          • 最后,applyPropertyValues(String beanName, BeanDefinition mbd, BeanWrapper bw, PropertyValues pvs) 为属性利用setter方法进行赋值
        • initializeBean(final String beanName, final Object bean, RootBeanDefinition mbd)初始化bean
          • 执行invokeAwareMethods(beanName, bean)
          • 执行applyBeanPostProcessorsBeforeInitialization(wrappedBean, beanName)
          • 执行invokeInitMethods(beanName, wrappedBean, mbd);这里说的初始化方法,指的是init-method和initlizingBean接口中的afterPropertySet()这类的方法
          • 执行applyBeanPostProcessorsAfterInitialization(wrappedBean, beanName);
        • 注册bean的销毁方法
      • 成功创建bean并返回
      • 添加到缓存,即singletonObjects中,是一个map。ioc容器,指的就是这一个个的map
    • 当所有的单实例bean都实例化完成后,遍历所有bean,找出其中类型为SmartInitializingSingleton的bean,并执行afterSingletonsInstantiated()
  • finishRefresh();

    • 执行initLifecycleProcessor();与生命周期有关
    • 执行getLifecycleProcessor().onRefresh();拿到生命周期相关的处理器,回调onRefresh()
    • 执行publishEvent(new ContextRefreshedEvent(this));发布容器刷新事件

spring容器创建小结

  • spring容器创建的时候,先会包保存注册进来的Bean的定义信息。方式有xml和注解
  • spring合适时机创建bean
    • getBean方式创建bean实例
  • 后置处理器:每一个bean创建过程,会被这些处理器拦截,增强功能
  • 事件驱动模型:ApplicationListener

spring web部分

Servlet容器(如Tomcat)启动的时候,会扫描应用和每一个jar包中的ServletContainerInitializer的实现,如过找到,就会执行onStartup

关于这个实现类,必须绑定在,META-INF/services/javax.servlet.ServletContainerInitializer中,文件内容就是ServletContainerInitializer实现类的全类名

servlet3.0整合springMVC

springMVC的jar包,包含了ServletContainerInitializer接口的实现类:SpringServletContainerInitializer

1
2
3
4
5
6
7
8
9
10
11
12
13
14
15
16
17
18
19
20
21
22
23
24
25
26
27
28
29
30
31
32
33
34
35
36
37
38
39

@HandlesTypes(WebApplicationInitializer.class)
public class SpringServletContainerInitializer implements ServletContainerInitializer {
//这个方法的作用是扫描类路径中所有实现了WebApplicationInitializer接口的类,并调用其中的onStartup方法,同时这个方法接受一个参数,servletContext
//原理就是servlet3.0会自动执行这个类,且将@HandlesTypes(WebApplicationInitializer.class)指定的class作为参数传入onStartup方法
public void onStartup(Set<Class<?>> webAppInitializerClasses, ServletContext servletContext)
throws ServletException {

List<WebApplicationInitializer> initializers = new LinkedList<WebApplicationInitializer>();

if (webAppInitializerClasses != null) {
for (Class<?> waiClass : webAppInitializerClasses) {
// Be defensive: Some servlet containers provide us with invalid classes,
// no matter what @HandlesTypes says...
if (!waiClass.isInterface() && !Modifier.isAbstract(waiClass.getModifiers()) &&
WebApplicationInitializer.class.isAssignableFrom(waiClass)) {
try {
initializers.add((WebApplicationInitializer) waiClass.newInstance());
}
catch (Throwable ex) {
throw new ServletException("Failed to instantiate WebApplicationInitializer class", ex);
}
}
}
}

if (initializers.isEmpty()) {
servletContext.log("No Spring WebApplicationInitializer types detected on classpath");
return;
}

servletContext.log(initializers.size() + " Spring WebApplicationInitializers detected on classpath");
AnnotationAwareOrderComparator.sort(initializers);
for (WebApplicationInitializer initializer : initializers) {
initializer.onStartup(servletContext);
}
}

}

WebApplicationInitializer

这个接口的一个实现类AbstractDispatcherServletInitializer

1
2
3
4
5
6
7
8
9
10
11
12
13
14
15
16
17
18
19
20
21
22
23
24
25
26
27
28
29
30
31
32
33
34
35
36
37
38
39
40
41
42
43
44
45
46
47
48
49
50
51
public void onStartup(ServletContext servletContext) throws ServletException {
super.onStartup(servletContext);
registerDispatcherServlet(servletContext);
}

//------------父类------------------------
protected void registerContextLoaderListener(ServletContext servletContext) {
WebApplicationContext rootAppContext = createRootApplicationContext();
if (rootAppContext != null) {
ContextLoaderListener listener = new ContextLoaderListener(rootAppContext);
listener.setContextInitializers(getRootApplicationContextInitializers());
servletContext.addListener(listener);
}
else {
logger.debug("No ContextLoaderListener registered, as " +
"createRootApplicationContext() did not return an application context");
}
}

//-------------------
protected void registerDispatcherServlet(ServletContext servletContext) {
String servletName = getServletName();
Assert.hasLength(servletName, "getServletName() must not return empty or null");
//创建一个web的ioc容器
WebApplicationContext servletAppContext = createServletApplicationContext();
Assert.notNull(servletAppContext,
"createServletApplicationContext() did not return an application " +
"context for servlet [" + servletName + "]");
//创建dispatcherServlet
FrameworkServlet dispatcherServlet = createDispatcherServlet(servletAppContext);
dispatcherServlet.setContextInitializers(getServletApplicationContextInitializers());
//添加到web容器中
ServletRegistration.Dynamic registration = servletContext.addServlet(servletName, dispatcherServlet);
Assert.notNull(registration,
"Failed to register servlet with name '" + servletName + "'." +
"Check if there is another servlet registered under the same name.");

registration.setLoadOnStartup(1);
registration.addMapping(getServletMappings());
registration.setAsyncSupported(isAsyncSupported());

Filter[] filters = getServletFilters();
if (!ObjectUtils.isEmpty(filters)) {
for (Filter filter : filters) {
registerServletFilter(servletContext, filter);
}
}

customizeRegistration(registration);
}

实现类AbstractAnnotationConfigDispatcherServletInitializer

1
2
3
4
5
6
7
8
9
10
11
12
常见spring容器,这里是注解形式的spring容器
protected WebApplicationContext createRootApplicationContext() {
Class<?>[] configClasses = getRootConfigClasses();
if (!ObjectUtils.isEmpty(configClasses)) {
AnnotationConfigWebApplicationContext rootAppContext = new AnnotationConfigWebApplicationContext();
rootAppContext.register(configClasses);
return rootAppContext;
}
else {
return null;
}
}

总结

注解方式启动springMVC,可通过继承AbstractAnnotationConfigDispatcherServletInitializer,实现其中的抽象方法,指定DispathcerServlet的配置信息

根容器配置示例

1
2
3
4
5
6
7
8
Configuration
@ComponentScan(basePackages = {"com.hhdd"}, excludeFilters = {
@ComponentScan.Filter(type = FilterType.ANNOTATION, classes = {Controller.class})
},useDefaultFilters = false)
public class RootConfig {


}

web容器配置示例

1
2
3
4
5
6
7
8
@Configuration
@ComponentScan(basePackages = {"com.hhdd"}, includeFilters = {
@ComponentScan.Filter(type = FilterType.ANNOTATION, classes = {Controller.class})
})
public class AppConfig {


}

实现AbstractAnnotationConfigDispatcherServletInitializer示例

1
2
3
4
5
6
7
8
9
10
11
12
13
14
15
16
17
18
19
20
21
22
23
public class MyWebInitializer extends AbstractAnnotationConfigDispatcherServletInitializer {
//获取根容器的配置类 父容器(spring配置文件)
@Override
protected Class<?>[] getRootConfigClasses() {
return new Class[]{RootConfig.class};
}

//获取web容器的配置类 子容器(springMVC配置文件)
@Override
protected Class<?>[] getServletConfigClasses() {
return new Class[]{AppConfig.class};
}

/**
* 给dispatcherServlet配置映射信息
*
* @return
*/
@Override
protected String[] getServletMappings() {
return new String[]{"/"};
}
}

springMVC注解版使用

自定义mvc需要的组件

通过继承WebMvcConfigurerAdapter,配合注解@EnableWebMvc

通过覆盖父类的方法来自定义组件

servlet的异步使用

示例

1
2
3
4
5
6
7
8
9
10
11
12
13
14
15
16
17
18
19
20
21
22
23
24
25
26
27
28
29
30
31
32
33
34
@WebServlet(value = "/async", asyncSupported = true)
public class HelloAsyncServlet extends HttpServlet {
@Override
protected void doGet(HttpServletRequest req, HttpServletResponse resp) throws ServletException, IOException {
System.out.println("主线程:" +Thread.currentThread() + "开始执行,时间:" +System.currentTimeMillis());
//开启异步模式
AsyncContext asyncContext = req.startAsync();
//业务逻辑以异步形式进行处理
asyncContext.start(() -> {
try {
System.out.println("副线程:" +Thread.currentThread() + "开始执行,时间:" +System.currentTimeMillis());
sayHello();
asyncContext.complete();
ServletResponse response = asyncContext.getResponse();
response.getWriter().write("HelloAsyncServlet.....");
System.out.println("副线程:" +Thread.currentThread() + "结束执行,时间:" +System.currentTimeMillis());
} catch (Exception e) {
e.printStackTrace();
}
});
System.out.println("主线程:" +Thread.currentThread() + "结束执行,时间:" +System.currentTimeMillis());
}

private void sayHello() throws Exception {
System.out.println(Thread.currentThread()+"processing....");
Thread.sleep(3000);
}
}
//---------------控制台输出-----------------------
主线程:Thread[http-nio-8080-exec-4,5,main]开始执行,时间:1617550229321
主线程:Thread[http-nio-8080-exec-4,5,main]结束执行,时间:1617550229329
副线程:Thread[http-nio-8080-exec-5,5,main]开始执行,时间:1617550229329
Thread[http-nio-8080-exec-5,5,main]processing....
副线程:Thread[http-nio-8080-exec-5,5,main]结束执行,时间:1617550232330

springMVC中的异步处理

1
2
3
4
5
6
7
8
9
10
11
12
13
14
15
16
17
18
19
20
21
22
23
24
@Controller
public class HelloAsyncController {
@ResponseBody
@RequestMapping("/async/hello")
public Callable<String> sayHello() {

System.out.println("主线程:" +Thread.currentThread() + "开始执行,时间:" +System.currentTimeMillis());
Callable<String> callable = () -> {
System.out.println("副线程:" +Thread.currentThread() + "开始执行,时间:" +System.currentTimeMillis());
Thread.sleep(3000);
System.out.println("副线程:" +Thread.currentThread() + "结束执行,时间:" +System.currentTimeMillis());
return "HelloAsyncController.....";
};
System.out.println("主线程:" +Thread.currentThread() + "结束执行,时间:" +System.currentTimeMillis());
return callable;
}
}

//---------------控制台输出-----------------------
//springmvc用一个异步线程池来处理异步请求
主线程:Thread[http-nio-8080-exec-4,5,main]开始执行,时间:1617551494128
主线程:Thread[http-nio-8080-exec-4,5,main]结束执行,时间:1617551494129
副线程:Thread[MvcAsync1,5,main]开始执行,时间:1617551494138
副线程:Thread[MvcAsync1,5,main]结束执行,时间:1617551497139

springmvc对异步请求的处理过程

  • 将callable提交到TaskExecutor,使用一个隔离线程进行执行
  • DispatcherServlet和所有的Filter退出web容器的线程,但是response保持打开的状态
  • Callable返回结果,springmvc将请求重新派发给容器,恢复之前的处理
  • springmvc继续进行视图渲染的流程(从头开始,请求,渲染…..)
DeferredResult的使用

示例

1
2
3
4
5
6
7
8
9
10
11
12
13
14
15
16
17
@ResponseBody
@RequestMapping("/createOrderStep1")
public DeferredResult createOrderStep1() {
DeferredResult<Object> deferredResult = new DeferredResult<Object>();
//保存到queue中
queue.saveDeferredResult(deferredResult);
return deferredResult;
}

@ResponseBody
@RequestMapping("/createOrderStep2")
public String createOrderStep2() {
DeferredResult deferredResult = queue.getDeferredResult();
String uuid = UUID.randomUUID().toString();
deferredResult.setResult(uuid);
return ("createOrderStep2..." + uuid);
}

场景说明:请求接入的时候,result的处理时间要很长,可以先找个queue保存起来(可以是消息队列等中间件)。其他线程在queue中获取到这个result,并且其他线程处理完业务逻辑后调用result.setResult()方法,先前被hold住的线程就可以继续放行。